You’ll agree when I say that adding a sauna to your bathroom isn’t just luxury. After all, this is the smartest way you can turn your daily routine into a relaxing ritual.
But here’s the thing: Cramming a sauna into any random corner won’t cut it. That’s because if your layout is off, it can feel cramped, uncomfortably hot, and way more hassle than it’s worth.
So, what’s the secret recipe here?
Well, it’s all about having a smart floor plan.
Whether you’ve got a tiny bathroom or a full-on master suite, the way you position your sauna, shower, and vanity makes all the difference.
In this guide, I will break it all down, including the right bathroom with sauna floor plan that doesn’t waste even an inch of space.
Let’s get started.
Key takeaways
- A smart floor plan is key to making a bathroom sauna functional and relaxing.
- Small bathrooms can still fit a 2-3 person sauna with clever space use.
- Medium bathrooms allow for a natural flow from vanity to shower to sauna.
- Large bathrooms can feature spacious saunas and luxury add-ons like benches or skylights.
- Always separate dry and wet zones for better comfort and moisture control.
- Plan essential sauna elements like benches, ceiling height, and heater placement in advance.
- Sauna doors must swing outward for safety and should open into the dry zone.
- Use vapor barriers and insulation in the sauna and not full waterproofing.
1. Figure out sauna dimensions based on total bathroom space
As the first step in deciding your sauna floor plan, I suggest you take a good look at your bathroom’s size. That’s because it’s the dimensions of your space that will decide what kind of sauna you can fit without making things feel cramped.
But rest assured, there’s always a sauna dimension and layout that can work for you, notwithstanding whether your bathroom is small, medium, or large. All you’ve got to do is plan smartly so that the sauna feels like a natural part of the room.
Here’s how you can do so:
A. For small bathrooms (sized about 5’x8’)
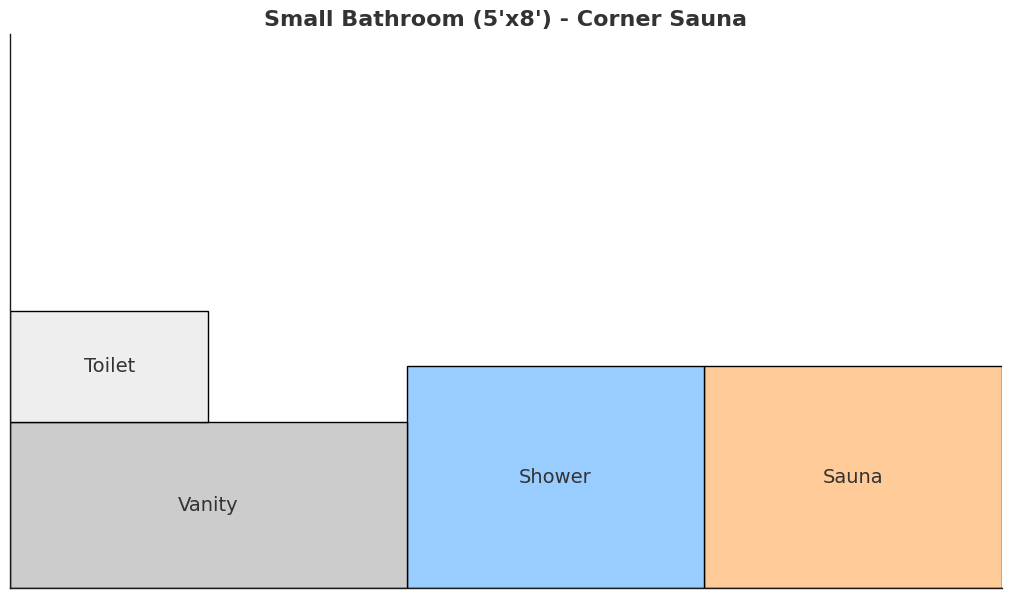
If your bathroom is on the smaller side, you’ll need to get creative with the layout. But that said, you can still fit a sauna.
Here, a compact 2–3 person sauna (around 4’x4’ or 4’x6’) can work really well.
The only catch is to maximize every inch. And you can do so by tucking the sauna into a back corner and placing a shower right next to it behind a shared glass enclosure.
This design keeps all the wet stuff contained in one zone, which helps prevent the rest of the bathroom from feeling humid or cluttered.
Similarly, you can position the vanity and toilet on the opposite side to maintain a dry zone.
Pro tip: Stick to lighter materials, minimalistic finishes, and glass partitions to keep things open and airy even in a tight footprint.
B. For medium bathrooms (sized around 8’x10’)
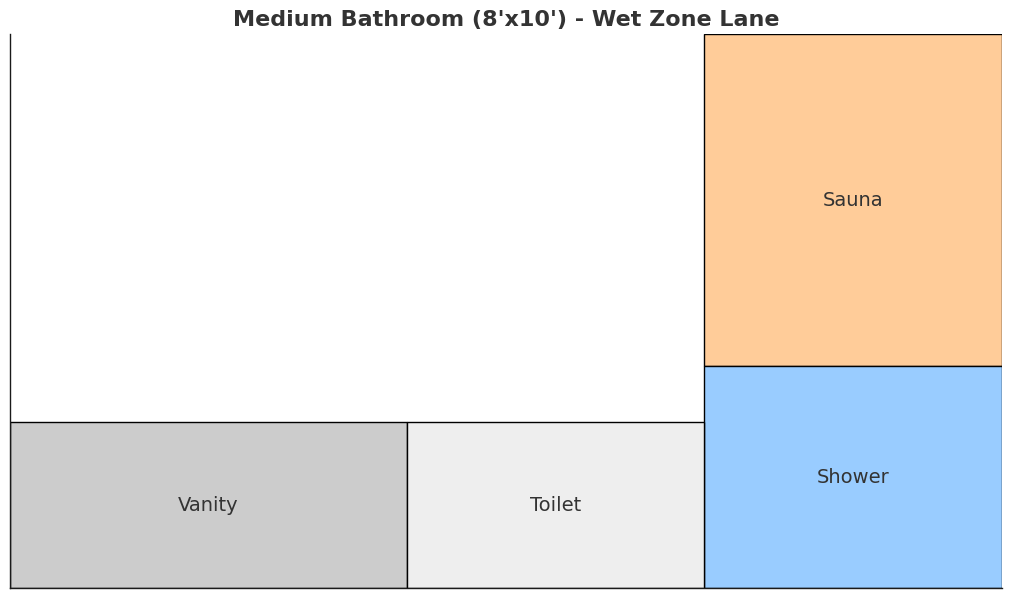
A medium-sized bathroom gives you a lot more room to work with and is compatible for a more functional layout.
Here, you can build a sauna sized between 5’x7’ and 6’x6’ and comfortably seats 2-4 people without making the space feel crammed.
One of the most efficient layouts here is placing the vanity near the entrance, the shower in the center, and the sauna at the back of the room. This creates a natural flow from dry vanity to wet shower to hot sauna, which is ideal for both daily use and relaxation.
Plus, you’ll also have enough room for towel storage or even heated floors for that extra spa vibe.
Pro tip: Use partial glass walls to separate the wet zone without visually cutting off the room.
C. For large bathrooms (sized around 10’x12’ or more)
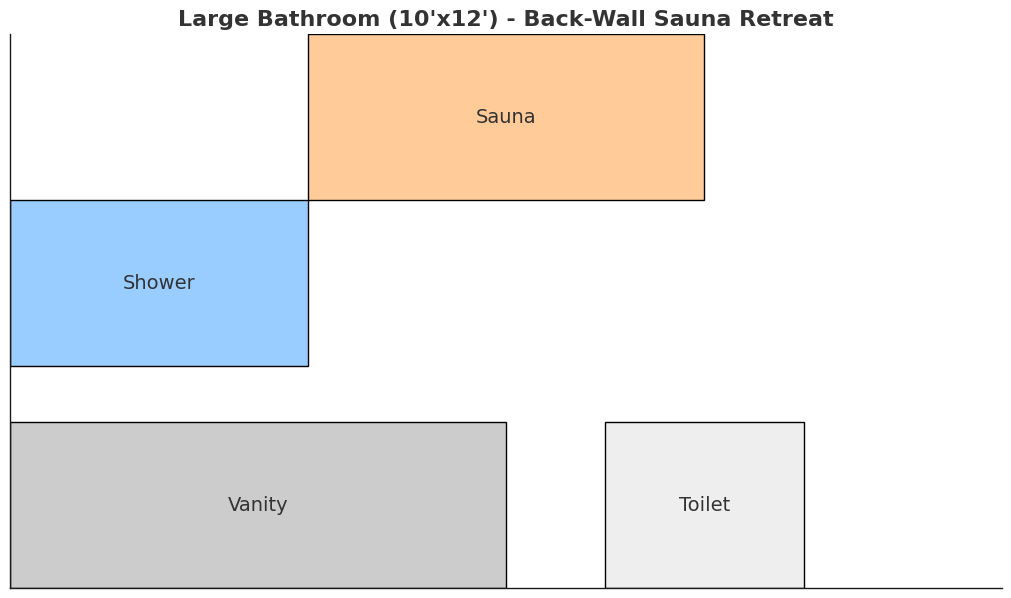
For those of you who have a large bathroom, you have the flexibility to get really creative with your sauna design.
In a space this size, you can go for a larger sauna (up to 6’x8’ or even more) that includes tiered benches, a bit of extra legroom, or even a small vestibule or changing area.
Not to mention, you can position the sauna as a focal point, maybe along the back wall or in its own glass-enclosed zone.
A great option is to dedicate one side of the bathroom to the wet zone, while keeping the dry zone clean and open with dual vanities and a lounging bench.
Large bathrooms are also perfect for adding luxury touches like skylights, built-in speakers, or aromatherapy features in the sauna.
Pro tip: Design with flow in mind so that everything feels connected rather than just placed.
2. Separate dry and wet zones

One of the most common mistakes people make with bathroom sauna floor plans is cramming everything including vanity, shower, toilet, and sauna into one mixed-up area.
Although it might seem like you’re saving space, in reality, it often leads to excess moisture, harder cleaning, and a layout that just doesn’t flow well.
The smarter way?
Divide your bathroom into two functional zones, namely:
A. Dry zone
This is where you keep everything that should stay dry like the vanity, toilet, towel storage, and possibly even a bench for changing.
Now, this is usually the first area you step into when entering the bathroom. So, keeping this space free from steam and splashes helps your storage and fixtures last longer.
B. Wet zone
These are the areas that naturally get steamy and wet. So it makes sense to group them together behind a glass partition or sliding door.
This setup keeps moisture contained, reducing the risk of water damage or mold in the dry zone.
Here’s why a dry and wet zone separation is great for your floor plan:
- Easier to clean: Water stays in one part of the room
- More comfortable: You don’t step into steam unless you want to
- Better for storage: Towels, wood cabinets, and toiletries stay dry and safe
- Visually clean: The layout feels intentional and spa-like
In short, here’s how dry and wet zone separation works
| Zone Type | Includes | Purpose |
| Dry Zone | Vanity, toilet, towel storage, bench | Keeps non-wet items clean and accessible |
| Wet Zone | Sauna, shower, bathtub (if any) | Contains steam/moisture, easier to clean, protects dry zone |
3. Plan your sauna essentials
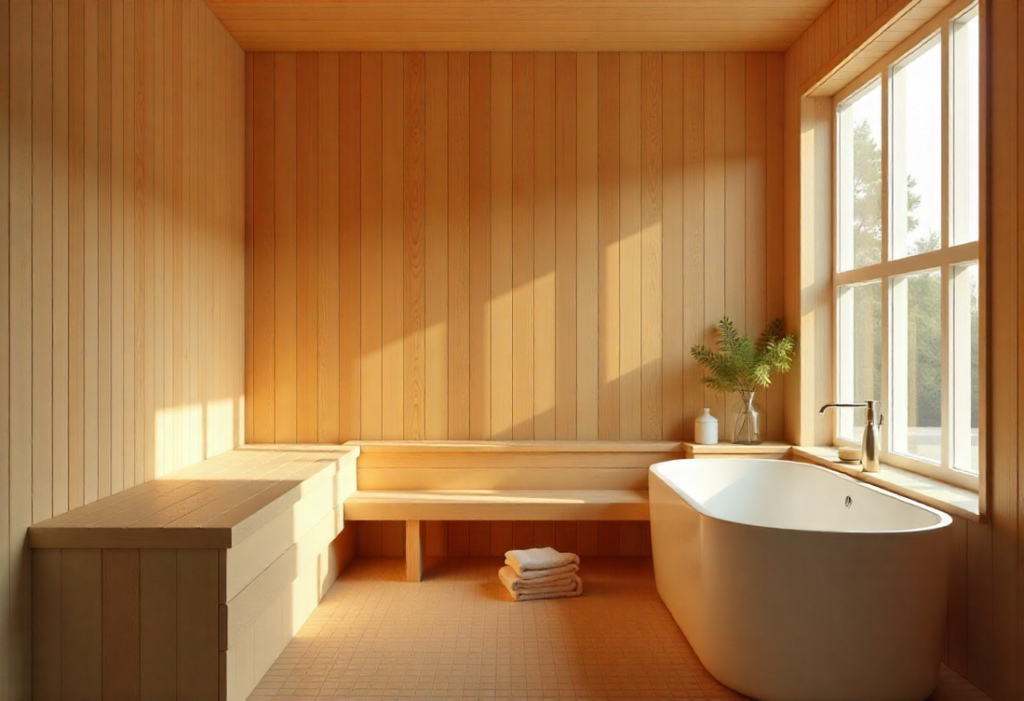
Once you’ve figured out where your sauna will go, it’s time to plan some important details that’ll make it both safe and enjoyable.
You see, there are a few essentials every bathroom sauna needs. And if you skip them, you might end up with a space that doesn’t work the way you hoped. This includes the following:
| Component | Details / Tips |
| Door | Always swings outward, ideally into dry zone for safety and moisture control |
| Size | 4×6 ft to 6×8 ft, 7 ft ceiling height (fits 2–4 people comfortably) |
| Benches | At least two levels; 24” deep top bench for lounging |
| Heater | Near door with a low air vent; controls outside the sauna |
Let me walk you through them in detail:
A. Sauna door
Sauna doors should swing outward, and never inward. This is a major safety rule in case of emergencies, and it’s also practical, especially in a tight space.
Think about where the door opens into. Ideally, it should open into the dry zone of the bathroom to help keep the sauna area cleaner and drier.
B. Sauna size and ceiling height
Most home saunas are around 4×6 feet or 5×7 feet, with a standard ceiling height of 7 feet
This size comfortably fits 2-4 people and provides just the right amount of space for relaxation without feeling too tight.
C. Benches
Benches are what make or break your comfort in a sauna. You’ll want at least two levels:
- The lower bench stays cooler (great if you want a more moderate experience)
- The upper bench gets the most heat (perfect for deep sweating)
A 24-inch deep top bench is the sweet spot since it is wide enough to sit comfortably or even lie down for a true spa feel.
D. Sauna heater
The best sauna heater is usually one that’s installed next to the door and has a low air vent nearby to help airflow.
And its controls are best placed outside as per sauna electrical requirements, so you can safely adjust settings without stepping into the heat.
These essentials are important for various reasons, including:
- Creating a safer and more user-friendly layout
- Maximizing comfort, even in small spaces
- Improving airflow, humidity control, and overall sauna performance
- Making daily use smoother, cleaner, and more enjoyable
4. Make sure the floor plan includes ample ventilation
Ventilation might not be the most exciting part of designing your bathroom sauna, but it’s crucial.
Why?
Saunas generate a lot of heat and humidity. And if you don’t have proper airflow, all that moisture will start to affect your bathroom in unpleasant ways.
This can result in anything from lingering steam to musty smells to foggy mirrors and even mold over time.
Here’s how you can include sauna ventilation in the floor plan and prevent these problems down the line:
| Ventilation Type | Location | Purpose |
| Bathroom Exhaust Fan | Near shower/wet zone, not over sauna | Removes steam, protects fixtures, prevents mold |
| Sauna Vents | One low (by heater), one high (opposite wall) | Maintains air flow, balances heat and humidity |
A. Bathroom fan
Your bathroom should already have an exhaust fan.
But where do you put it?
I suggest you install it near the shower or wet zone, and not directly over the sauna. This way, it can pull out steam from the most active area without interfering with the controlled environment inside the sauna.
Also, if your sauna shares space with the shower in a glass enclosure, place the fan just outside the glass to catch the steam as it escapes.
B. Sauna vents
Every proper sauna needs two vents:
- A low vent near the heater (usually at floor level)
- A high vent on the opposite wall, closer to the ceiling
This setup allows for natural airflow, drawing in fresh air while letting hot, humid air escape. Also, it helps the heater work more efficiently and prevents that stuffy feeling you can get in a poorly ventilated sauna.
5. Don’t ignore waterproofing
Your shower needs full waterproofing including sloped floors, proper drainage, and sealed walls to handle splashing and daily moisture.
Your sauna, however, doesn’t need to be waterproofed the same way. Instead, it requires a vapor barrier and insulation to manage heat and humidity.
Here’s how you can go about bathroom sauna waterproofing:
- Waterproof the shower
- Add insulation and vapor barrier to the sauna
| Area | Required Waterproofing | Reason |
| Shower | Full waterproofing (floors, walls, slope) | Handles direct water, splashing, and daily wet use |
| Sauna | Vapor barrier and insulation only | Manages heat and moisture without trapping condensation |
Final thoughts
The right floor plan for a bathroom with a sauna isn’t one-size-fits-all. That’s because your ideal floor plan depends on your space, how many people will use it, and how you want the bathroom to feel.
Think of your sauna not just as a hot room, but as part of your bathroom’s flow. This will help you get the plan right and you’ll look forward to stepping in every single day.
Got more questions or want a top-quality sauna for your bathroom?
You can get in touch with us!
At Steam Shower and Sauna, we bring the best-in-class sauna equipment and accessories from industry-leading manufacturers like Amerec and Mr Steam. And we’ve got all your home sauna needs covered on a budget.
FAQs about bathroom with sauna floor plan
Can I add a sauna to a small bathroom?
Yes, absolutely!
Even small bathrooms (around 5’x8’) can fit a compact 2-3 person sauna, usually about 4’x4’ or 4’x6’.
The key is smart planning, like placing the sauna in a corner and combining it with the shower behind a glass enclosure to save space.
Does a sauna need to be waterproofed like a shower?
No, saunas don’t require full waterproofing like showers do. Instead, they need proper insulation and a vapor barrier to control heat and humidity.
Over-waterproofing a sauna can actually trap moisture in the walls and cause damage.
What’s the ideal sauna size for a home bathroom?
Most home saunas range from 4’x6’ to 6’x8’, with a 7-foot ceiling. This comfortably fits 2-4 people.
Always choose a size that suits your space. Bigger isn’t always better if it makes the rest of your bathroom feel cramped.
How do I separate wet and dry zones in the bathroom?
Use glass partitions or sliding doors to divide the space. Keep items like your vanity, toilet, and towel storage in the dry zone, and place the shower and sauna in the wet zone.
This layout keeps humidity under control and makes the room easier to clean.
Do I need special ventilation for a sauna inside a bathroom?
Yes, proper ventilation is essential. The sauna itself should have two vents, one low near the heater and one high on the opposite wall.
Plus, your bathroom should have an exhaust fan near the wet zone to remove moisture and prevent mold.
Should the sauna door swing in or out?
Always outward.
Sauna doors are designed to swing outward for safety and easy exit. It’s also best to have the door open into the dry zone to avoid tracking water from the shower area into the sauna.
Can I build a sauna in a bathroom myself?
Some experienced DIYers can handle a basic sauna build, but for best results it’s smart to consult a professional. Poor planning can lead to long-term issues like heat loss or moisture damage.
What kind of wood is best for a sauna?
Cedar, hemlock, and aspen are popular sauna woods. They’re soft, heat-resistant, and don’t overheat to the touch.
Plus, they give off a natural, relaxing aroma that adds to the spa-like experience.

Jordan is a content writer covering steam showers, saunas, home wellness, and modern bathroom design. With a focus on practical, research-based information, Jordan helps readers make informed decisions about creating relaxing, spa-inspired spaces at home.